About Me ☆

Hello, I am Sami, the Girl behind Guilty Pleasures. I have been
writing tutorials since May 22, 2009. My first tutorial was called Twilight Obsession. How I got my name is simple. I found tagging to be my Guilty Pleasure. I thought it fit perfectly. I am a designer as well. You can find links to my blogs on my top menu. If you have questions please feel free to ask. Other wise you can read more about me on my
ABOUT ME PAGE!
My Blogs☆

Store Manager ☆

CT Manager☆


Favorite Blogs ☆


My Hangouts☆


Friday, May 28, 2010
Kiss Me Fool

Scrap Kit by Polkadot Scraps
You can purchase this kit @ Twilight Scraps
Tube of choice. I am using the Pinup Toons.
You can purchase them and a license to use @ CILM
Mask 209 by Weescotslass Creations
This tutorial was written on 28May2010 by Samantha
All similarities to this is completely coincidental.
CREATE NEW RASTER LAYER 600x600
open element31 Copy and paste as new layer
Open tube copy and paste as new layer
move above the element layer
Open paper 12
copy and paste as new layer
Move below all other layers
go to layer
Load and save mask
I am using mask 209
merge mask group
open element5
copy and paste as new layer
move below your tube
resizing by 60%
open element 39
Copy and paste as new layer
move above your mask layer
open element 21
copy and paste as new layer
resize by 80%
move below your tube
see mine for placement
Add name and copyright and save
Tuesday, May 18, 2010
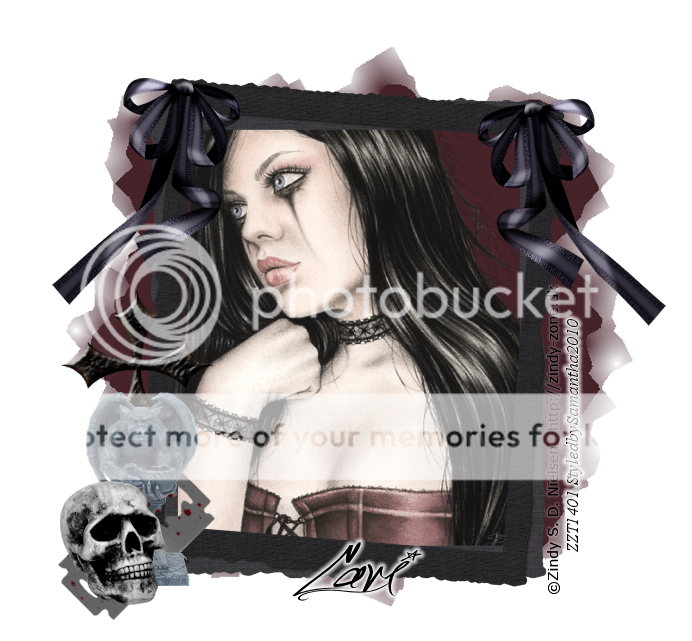
Chained to Pain

PTU Scrap Kit Chained to the Pain by Gothic Inspirations.
create new raster layer 750x700
Open your film strip and copy and paste as new layer
open poser 1 copy and paste as new layer
we are going to put a piece of her into each section of the frame
I duplicated her 3 times
and placed each layer below the frame
THe way i wanted it.
Grab your magic wand and select inside of each section of the
frame, go to selections, modify and expand by 2
Invert and delete each of the tube layers
open your black parchment
copy and paste as new layer
move below all others.
Resize up as needed and
carefully erase the parts that are not below the frame
Merge all three sections of Poser 1
and add a luminance legacy to those..
open your ball and chain
copy and paste as new layer
Resize up as needed
duplicate and paste on the top and bottom of the frame
open poser 2
copy and paste as new layer
resize down by 75%
Move above all other layers and on top of the frame.
To where she is laying on it..
open your teaser copy and paste as new layer
resize down by 75%
Move below the bottom ball& Chain
Duplicate and mirror
Open your BDSM Work art
copy and paste as new layer
Resize to your liking.
See mine for placement.
add your copyright and name
Save and your complete.
Wednesday, May 12, 2010
All My Love
CREATIVE ADDICTIONS EXCLUSIVE TUTORIAL

You can find this tutorial Here
Remember you dont have to be a member to view
the tutorials on Creative Addictions..


Friday, May 7, 2010
Glamourous

Supplies Needed
ScrapKit Glamour Girl by Grunge & Glitter
You can purchase her kit here
Tubes by Keith Garvery
you can purchase his work here
This tutorial was written on 7May2010 by Samantha.
Any similarities is completely coincidental.
Create new layer 700x700
open frame 1 copy and paste as new layer
Resize down by 80%
open both of your tubes.. I am using 2
that have close up layers
Grab one close up layer
copy and paste as new layer
move below your frame layer
Grab your magic wand
and select in the one side of the frame
invert and hit delete.
Do the same with the second tube
Open paper 14 copy and paste as new layer
move below the tube layers
Highlight the frame layer
grab your selection tool
click inside both sides of the frame
Go to selections, modify and expand by 5
Highlight the paper layer and go to selections
invert and hit delete
Highlight tube layer 1
and make it Luminace legacy.
do the same for the other
open doodle 3
copy and paste as new layer
resize by 75%
Move below all other layers
duplicate and flip
open element cluster
copy and paste as new layer
Resize by 80
move above all other layers
place in the center of the frame
open your full size tube
copy and paste as new layer
I used both..
Place on each side of the frame
Add name and copyright dont forger to save.
Your done. I would love to see results.
Please feel free to send them my way.
Subscribe to:
Posts (Atom)
My Blinkie ☆
